
The 10-Day .Net Aspire Challenge - Day 2: Add MSSQL Component
\
Step-by-step guide on how to use the .Net Aspire MSSQL component in Visual Studio.
Introduction
.Net Aspire framework is used to develop cloud and production-ready distributed applications. It consists of components to handle cloud-native concerns, such as Redis, Postgres, etc.
Prerequisites
Install .Net 8
Install Visual Studio 2022 version 17 or higher
.Net Aspire Workload
Container runtime such as Docker Desktop
10 Day .Net Aspire Challenge
Edit descriptionsinghsukhpinder.medium.com
Objectives
Learn how to create a starter project using .Net Aspire with MSSQL EF Core component.
\
Github Sample: The solution structure is divided into the following projects
DotnetAspireChallenge.ApiService
DotnetAspireChallenge.AppHost
DotnetAspireChallenge.ServiceDefaults
DotnetAspireChallenge.Web
Getting Started
Step 1: Install the following NuGet package
Install the following Nuget package into the subsequent project “DotnetAspireChallenge.AppHost”
dotnet add package Aspire.Hosting.SqlServer
In the above project, register a SQL server database and costume the SQL connection using following code.
var sql = builder.AddSqlServer("sql")
.AddDatabase("sqldata");
var apiService = builder.AddProject<Projects.DotnetAspireChallenge_ApiService>("apiservice")
.WithReference(sql);
Step 2: Install another NuGet package
Install the following Nuget package into the subsequent project “DotnetAspireChallenge.ApiService”
dotnet add package Aspire.Microsoft.EntityFrameworkCore.SqlServer
then register the context into the Program.cs file as follows
builder.AddSqlServerDbContext<MssqlDbContext>("sqldata");
Step 3: Create a “Customer” class
public class Customer
{
public int Id { get; set; }
[Required]
public string Title { get; set; } = string.Empty;
[Required]
public string Description { get; set; } = string.Empty;
}
Step 4: Create an extension class
Create an extension class and register a minimal API get method to demonstrate the MSSQL context usage in the API Service
public static class AspireMssqlExtension
{
public static void MapMssqlAspireEndpoint(this WebApplication app)
{
app.MapGet("/mssql", async (MssqlDbContext mssqlDbContext) =>
{
await mssqlDbContext.Customers.AddAsync(new Customer()
{
Title = "[email protected]",
Description = "sukh"
});
int rows = await mssqlDbContext.SaveChangesAsync();
if (rows > 0)
{
return await mssqlDbContext.Customers.FirstOrDefaultAsync();
}
else
{
return null;
}
});
}
}
internal class MssqlDbContext(DbContextOptions options) : DbContext(options)
{
public DbSet<Customer> Customers => Set<Customer>();
}
and finally, register in the Program.cs file
app.MapMssqlAspireEndpoint();
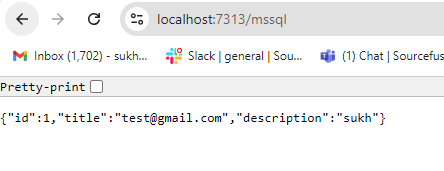
Step 5: Hit the GET endpoint
Finally, navigate to the GET URL shown below in your browser. It will insert the specified customer into the MSSQL database, retrieve the most recently inserted row, and display it as a response.
\
\
Add additional connection string properties using the JSON syntax
{
"Aspire": {
"Microsoft": {
"EntityFrameworkCore": {
"SqlServer": {
"ConnectionString": "YOUR_CONNECTIONSTRING",
"DbContextPooling": true,
"DisableHealthChecks": true,
"DisableTracing": true,
"DisableMetrics": false,
"AnotherDbContext": {
"ConnectionString": "AnotherDbContext_CONNECTIONSTRING",
"DisableTracing": false
}
}
}
}
}
}
\
Congratulations..!! You’ve successfully integrated the MSSQL component into the .Net Aspire project.
Github Project
GitHub — ssukhpinder/DotnetAspireChallenge: 10 Day .Net Aspire Challenge
\
Welcome to Billionaire Club Co LLC, your gateway to a brand-new social media experience! Sign up today and dive into over 10,000 fresh daily articles and videos curated just for your enjoyment. Enjoy the ad free experience, unlimited content interactions, and get that coveted blue check verification—all for just $1 a month!
Account Frozen
Your account is frozen. You can still view content but cannot interact with it.
Please go to your settings to update your account status.
Open Profile Settings