
How to Build DApp on Rootstock with Next.js, Typescript, and Solidity
\
Welcome to a comprehensive guide on "Building a Decentralized Messaging Application with Next.js, TypeScript, and Solidity". In this tutorial, we'll construct a decentralized messaging application that harnesses the power of blockchain technology.
\
You'll gain a clear understanding of the following:
Building dynamic interfaces with Next.js
Crafting Ethereum smart contracts with Solidity
Incorporating static type checking using TypeScript
Deploy Solidity Code as RSK Smart Contract
The fundamentals of blockchain-based messaging applications
\
By the end of this guide, you'll have a functioning decentralized platform where users can send and receive messages, with all transactions managed and secured by Rootstock | Ethereum smart contracts.
\
Prerequisites
You will need the following tools installed to build along with me:
Node.js
NPM
Git Bash
MetaMask
Next.js
Solidity
Hardhat
Tailwind CSS
\
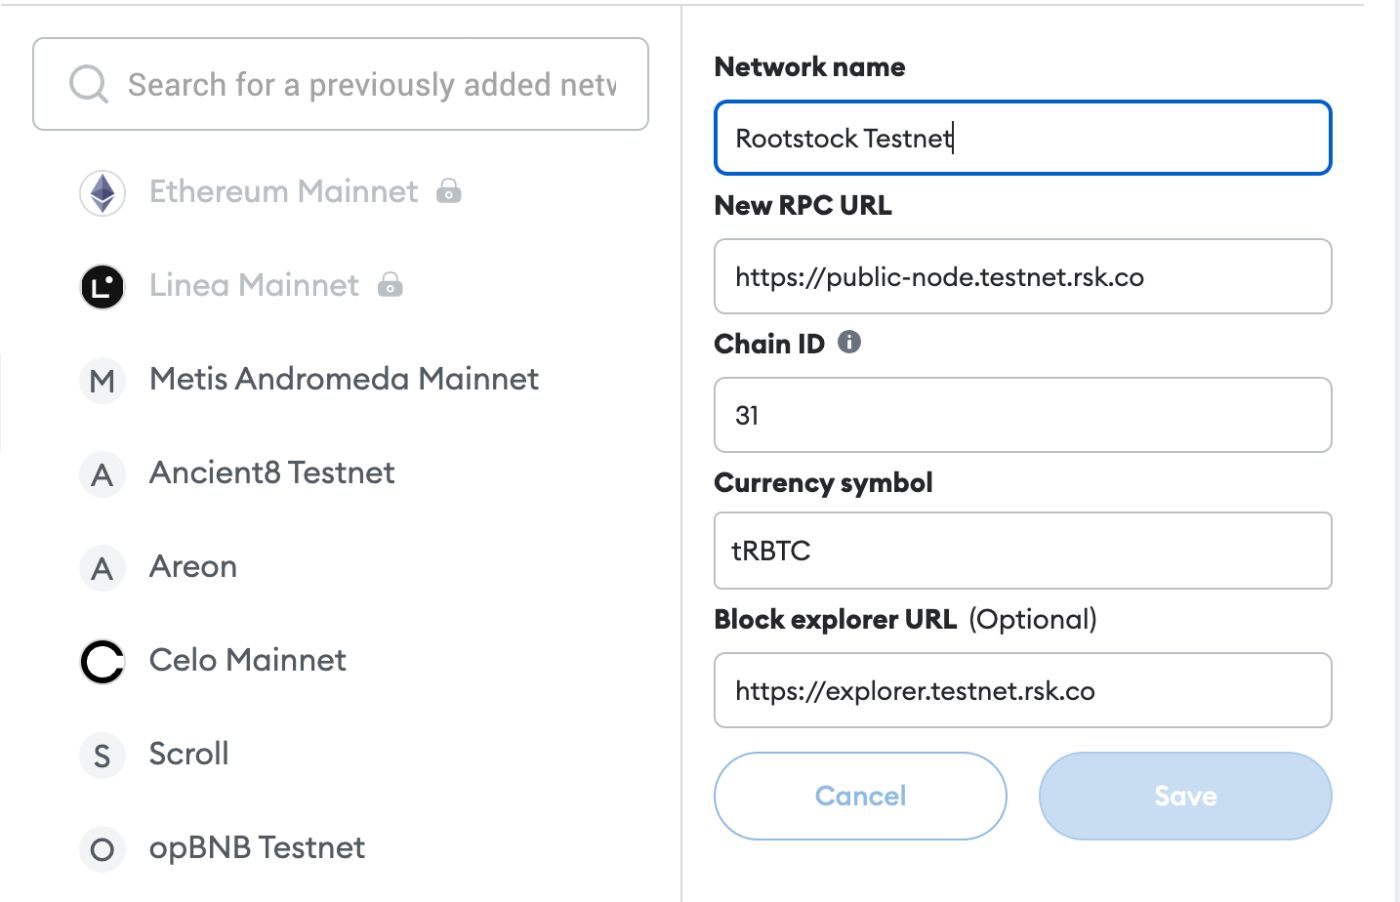
Steps to add Rootstock Testnet Details in Metamask
Open the MetaMask Chrome extension
In the network options, choose custom RPC
Enter RSK Testnet as the Network Name
Enter https://public-node.testnet.rsk.co as the RPC URL
Enter RBTC as SymbolPut and Save
Copy the account address
Get the Faucet (tRBTC) from: https://faucet.testnet.rsk.co/
\
With that said, let’s jump into the tutorial and set up our project.
\
\
Setup for Smart Contract Development
Next, we'll develop the smart contract for our platform:
Create a contracts folder at the project root.
Inside contracts, create a Message.sol file and add the contract code below.
\
// SPDX-License-Identifier: MIT
pragma solidity ^0.8.20;
contract MessagingApp {
struct Message {
address sender;
address recipient;
string content;
uint256 timestamp;
}
Message[] public messages;
event MessageSent(address indexed sender, address indexed recipient, string content, uint256 timestamp);
function sendMessage(address _recipient, string calldata _content) external {
require(_recipient != address(0), "Recipient address cannot be zero address");
require(bytes(_content).length > 0, "Message content cannot be empty");
Message memory newMessage = Message({
sender: msg.sender,
recipient: _recipient,
content: _content,
timestamp: block.timestamp
});
messages.push(newMessage);
emit MessageSent(msg.sender, _recipient, _content, block.timestamp);
}
function getMessages() external view returns (Message[] memory) {
return messages;
}
function getMessagesByRecipient(address _recipient) external view returns (Message[] memory) {
uint256 messageCount = 0;
for (uint256 i = 0; i < messages.length; i++) {
if (messages[i].recipient == _recipient) {
messageCount++;
}
}
Message[] memory recipientMessages = new Message[](messageCount);
uint256 j = 0;
for (uint256 i = 0; i < messages.length; i++) {
if (messages[i].recipient == _recipient) {
recipientMessages[j] = messages[i];
j++;
}
}
return recipientMessages;
}
}
\
The provided Solidity smart contract facilitates a decentralized messaging application, enabling users to send and receive messages securely on the blockchain.
\
The contract defines a Message structure to store the details of each message, including the sender, recipient, content, and timestamp.
An array of Message structs is used to store all messages, ensuring a complete and immutable record of communication.
The sendMessage function allows users to send messages by specifying the recipient's address and the message content. It includes validation checks to ensure that the recipient address is valid and the message content is not empty.
Upon sending a message, an MessageSent event is emitted to log the action.
The contract also provides functions to retrieve all messages (getMessages) and to fetch messages sent to a specific recipient getMessagesByRecipient.
\
Contract Deployment and Compilation
Now, let's deploy our smart contract and populate it with some dummy data:
Create a scripts folder at the project root.
Inside scripts, create a deploy.js and a seed.js file and add the following codes.
Deploy Script
import { ethers } from "hardhat";
async function main() {
const MessagingApp = await ethers.deployContract("MessagingApp");
await MessagingApp.waitForDeployment();
console.log(`MessagingApp deployed to: ${MessagingApp.target}`);
}
// We recommend this pattern to be able to use async/await everywhere
// and properly handle errors.
main().catch((error) => {
console.error(error);
process.exitCode = 1;
});
\
Update the Hardhat Config File with the Below Code
import { HardhatUserConfig } from "hardhat/config";
import "@nomicfoundation/hardhat-toolbox";
require("dotenv").config();
const { PRIVATE_KEY } = process.env;
const config: HardhatUserConfig = {
defaultNetwork: "localhost",
networks: {
localhost: {
url: " http://127.0.0.1:8545/",
},
rootstock_testnet: {
url: "https://public-node.testnet.rsk.co",
accounts: [PRIVATE_KEY],
chainId: 31,
},
},
etherscan: {
customChains: [
{
network: "rootstock_testnet",
chainId: 31,
urls: {
apiURL: "https://api-rsk-testnet.explorer.rootstock.io/api/",
browserURL: "https://explorer.testnet.rootstock.io/",
},
},
],
},
solidity: "0.8.20",
};
export default config;
\
Run the following commands to deploy the contract on Rootstock:
npx hardhat compile
npx hardhat run ./scripts/deploy.ts --network rootstock_testnet
\
If you did that correctly, you should see a similar output like the one below:
\
https://explorer.testnet.rootstock.io/address/0xbfff78bb02925e4d8671d0d90b2a6330fcaedd87?embedable=true
\
At this point, we can start the integration of our smart contract to our front end.
\
git clone https://github.com/Kali-Decoder/Rootstock_Dapp
cd next
npm install
\
Finally, run npm run dev to start the project.
\n
You will see the starting page click on meta mask to connect your account to this website and move to the Rootstock chain that is 31 (Chain ID)
\
\
\
As you can see in the UI, we are connected to the Rootstock Chain with an account address ending in 891. You can now send a message to the Rootstock Community by typing in the input box and clicking on "Send."
\
Metamask will then pop up, prompting you to sign the transaction and pay the gas fees.
\
\
Package.json
{
"name": "next",
"private": true,
"version": "0.0.0",
"type": "module",
"scripts": {
"dev": "vite",
"build": "tsc && vite build",
"lint": "biome check .",
"preview": "vite preview"
},
"dependencies": {
"@tanstack/react-query": "5.0.5",
"react": "^18.2.0",
"react-dom": "^18.2.0",
"viem": "latest",
"wagmi": "latest"
},
"devDependencies": {
"@biomejs/biome": "^1.1.2",
"@types/react": "^18.2.23",
"@types/react-dom": "^18.2.8",
"@vitejs/plugin-react": "^4.1.0",
"@wagmi/cli": "latest",
"autoprefixer": "^10.4.19",
"buffer": "^6.0.3",
"postcss": "^8.4.38",
"tailwindcss": "^3.4.3",
"typescript": "^5.2.2",
"vite": "^4.4.9"
}
}
\
Here’s an overview of the libraries we are using and their purposes:
Dependencies
@tanstack/react-query (5.0.5): For managing server-state in React applications, providing hooks for fetching, caching, and updating asynchronous data.
react (^18.2.0): A JavaScript library for building user interfaces.
react-dom (^18.2.0): Serves as the entry point to the DOM and server renderers for React.
viem (latest): A library for interacting with Ethereum and other EVM-compatible blockchains, simplifying the process of working with smart contracts and blockchain data.
wagmi (latest): A collection of React hooks and utilities for working with Ethereum, enabling wallet connections and interactions with blockchain networks.
tailwindcss (^3.4.3): A utility-first CSS framework for rapidly building custom user interfaces.
\
const account = useAccount();
const { connectors, connect } = useConnect();
const { disconnect } = useDisconnect();
const [previousMessages,setPreviousMessages] = useState([]);
const makeAnMessage = async (msg: string) => {
let res = await writeContract({
abi,
address: "0xbfff78bb02925e4d8671d0d90b2a6330fcaedd87",
functionName: "sendMessage",
args: [
"0x44c71DA900A47Fd1088c40a4a141f41d1f2b683D",
msg,
],
});
console.log(res, "res");
};
const getMessages = async () => {
let data = await readContract({
abi: abi,
address: "0xbfff78bb02925e4d8671d0d90b2a6330fcaedd87",
functionName: "getMessagesByRecipient",
args: ["0x44c71DA900A47Fd1088c40a4a141f41d1f2b683D"],
chainId: rootstockTestnet.id
});
setPreviousMessages(data);
console.log("data", data);
};
useEffect(() => {
(async () => {
await getMessages();
})();
}, []);
\
makeAnMessage Function
This function sends a message to a smart contract on the blockchain.
async (msg: string): This is an asynchronous function that takes a message string as an argument.
writeContract({…}): This function call interacts with a smart contract to execute the sendMessage function.
abi: The ABI (Application Binary Interface) of the smart contract, which defines its functions and their parameters.
address: The address of the smart contract on the blockchain.
functionName: The name of the function to call on the smart contract, which is sendMessage in this case.
args: The arguments to pass to the sendMessage function. Here, it includes the recipient's address and the message "Rajasthan Royals Won the Match"
\
getMessages Function
This function retrieves messages for a specific recipient from the smart contract.
async (): This is an asynchronous function that doesn’t take any arguments.
readContract({…}): This function call interacts with a smart contract to execute the getMessagesByRecipient function.
abi: The ABI of the smart contract.
address: The address of the smart contract on the blockchain.
functionName: The name of the function to call on the smart contract, which is getMessagesByRecipient in this case.
args: The arguments to pass to the getMessagesByRecipient function. Here, it includes the recipient's address.
chainId: The ID of the blockchain network (Rootstock Testnet in this case) where the contract is deployed.
Conclusion
In this tutorial, we have successfully built a decentralized messaging application using Next.js, TypeScript, and Solidity. We've set up our development environment,deployed our smart contract to the Rootstock network.
\
We've created dynamic interfaces, developed Rootstock smart contracts, and managed shared data with Context. By integrating the smart contract with the front end, we've enabled users to send and receive messages securely, with all transactions managed and recorded by Rootstock smart contracts.
\
Now, you're equipped with the skills to build your own decentralized messaging application. We've also provided you with a live demo and the finished project in our git repo for reference.
\
Happy coding!
Welcome to Billionaire Club Co LLC, your gateway to a brand-new social media experience! Sign up today and dive into over 10,000 fresh daily articles and videos curated just for your enjoyment. Enjoy the ad free experience, unlimited content interactions, and get that coveted blue check verification—all for just $1 a month!
Account Frozen
Your account is frozen. You can still view content but cannot interact with it.
Please go to your settings to update your account status.
Open Profile Settings